
 Archery in films is usually barebow, which makes it look easy. For beginners
its popular for the first lesson because it uses simple bows, and is
easy to learn when shooting at one short distance.
Archery in films is usually barebow, which makes it look easy. For beginners
its popular for the first lesson because it uses simple bows, and is
easy to learn when shooting at one short distance.
Unfortunately, it's very difficult to progress, so beginners usually switch to aiming with a sight at the second lesson. This collection of notes and pictures has been gathered from many web sites and by looking at pictures. So some information may be wrong, and some may not work for you.
While there are no sights allowed, there are parts of the bow and tab that can be used to help with aiming. The arrow point, arrow shaft diameter, end of the arrow rest, the arrow shelf, stitching on the tab and the centre serving can all be used to aid aiming. The easiest aiming is probably a combination of face walking, string walking and a little bit of gap shooting.
In field archery, you only get 3 or 4 arrows per target, so to get a good score the first arrow has to be accurate. There will be about 24 to 28 targets of different sizes, at different distances which will be from 5 to 50 meters. The distance may or may not be known and may be up or down hill.
In target archery you get a minimum of 24 arrows at the same distance and only 3 or 4 distances, however the distance shot is usually much longer (up to 100 yards or 90 meters). While there is time to adjust and improve the aim, it helps to get a good score if the first arrows are in the centre.
There are many slightly different sets of rules for barebow shooting, WA, EFAA, IFAA, NFAS etc. So check the rules of a competition before you get there. From April 2020 Archery GB have dropped their own rules for barebow and now refer to the World Archery rules.
Archery GB and World Archery recognises recurve barebow. Archery GB also has recurve traditional and longbow for target archery. Archery GB Rules of Shooting 204 applies to recurve barebow. 205 for traditional, 206 for longbow and 206a for American flatbow. A lot of competitions only recognise recurve barebow and longbow. Recurve barebow with no stabilizer, no clicker, no kisser button and no sight. No markings or extras that could be used as a sighting aid. Mostly this applies to the middle of the riser, no sight block or sight block screws, no clicker screw, no makers logo on the riser that can be seen by the archer. Weights can be added to the bottom of the riser, but they need to be short and fat. Some bows can have the weights inserted into the riser. A long thin weight might be considered to be a stabilizer.
World Archery (and Archery GB) barebow rules for target archery are in, World Archery Rule Book 3, chapter 11.4, and for field in rule book 4 chapter 22.3. This includes passing the unbraced bow through a 12.2cm ring. Archery GB previouly did not use this for target (only for field) so at record status events a judge may want check this at any time, so be prepared to unstring and re-string your bow.
English Field Archery Association (EFAA) mostly follows the International Field Archery Association (IFAA) rules. Face walking, string walking and a full set of stabilizers are allowed.
National Field Archery Society (NFAS) does not allow face walking, string walking, or notes of any kind (so no written sight marks), but does allow a long rod. Archers have been disqualified just for having notes in their quiver, even though they have not referred to them. If you want to string walk or face walk, then you are in the same class as those with sights.
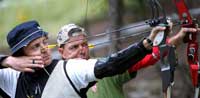
 3 fingers under the arrow nock or Mediterranean split fingers, one
finger above and 2 below. The first is more popular in field archery
since it allows string walking for close targets. The second gives
the steeper angle to the arrow needed to reach longer distances of
target archery but is possibly not as accurate since you have to use
gap shooting. However, if face and string walking is not allowed by
the rules then there are advantages to both styles of grip.
3 fingers under the arrow nock or Mediterranean split fingers, one
finger above and 2 below. The first is more popular in field archery
since it allows string walking for close targets. The second gives
the steeper angle to the arrow needed to reach longer distances of
target archery but is possibly not as accurate since you have to use
gap shooting. However, if face and string walking is not allowed by
the rules then there are advantages to both styles of grip.
Like throwing a ball, just concentrate on the target and release the arrow. OK, for very short distances, but takes lots and lots of practice. Good for hunting and moving targets at close range. There may be some element of split vision taking place with a small amount of attention on the position of the bow or the arrow.
Simple but the gap can be large unless used with other aiming systems. Accuracy decreases with a bigger gap, and aiming at some point off the target does not usually produce good results. With unknown target sizes you can use the arrow diameter as a measure. Adjust the aim by moving the aim in opposite direction by the same amount. So if know you hit 1 shaft diameter above the centre at this distance, move the aim point 1 shaft diameter below. The difference between gap shooting and split vision is in where you concentrate when aiming. Gap shooting for target archery when the target will not move and you can concentrate on the location the arrow tip is to be placed. Split vision for hunting and moving targets where you need to concentrate more on the actual target, and only a little on the arrow tip.
 Using 3 fingers under the arrow, and varying the gap between the
arrow and fingers. Good for shorter distances, with the right limb
strength and arrow mass it's possible to do all the field distances
using string walking. Adjust the aim by moving your hand up the
string to go higher on the target, down the string to go lower on the
target. Works best for up to 2 or 3 inches down the string as it
detunes the bow. Tuning a bow for string walking is another issue,
most say use the zero tiller, raise the nocking point, and increase
the bracing height. However, its only ever going to be a approximate
and moving up or down the string will unbalance the bow.
Using 3 fingers under the arrow, and varying the gap between the
arrow and fingers. Good for shorter distances, with the right limb
strength and arrow mass it's possible to do all the field distances
using string walking. Adjust the aim by moving your hand up the
string to go higher on the target, down the string to go lower on the
target. Works best for up to 2 or 3 inches down the string as it
detunes the bow. Tuning a bow for string walking is another issue,
most say use the zero tiller, raise the nocking point, and increase
the bracing height. However, its only ever going to be a approximate
and moving up or down the string will unbalance the bow.
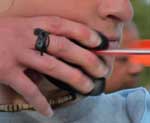
Using a tab with clear stitching is great for string walking.
e.g. Spigarelli Amico Tab designed for shooting with
3 fingers under the arrow has very clear stitches about 4mm apart.
Barebow is more popular in other parts of Europe, so check somewhere
like http://archery.ixpesports.nl, Archer Accessories, Tabs, Barebow Tabs
for a bigger range of tabs or http://vlbbtab.com
for a custom made one. Yost tabs are popular in the USA, with or without marks, Silver Archery has them.

Marking the tab was not allowed, but some limited marks are now allowed under WA field rules. So you can now fix a tape with lines for each distance but not write the distance on. The lines have to be the same, but the spacing does not have to be uniform.
WA Book 4 - 22.3.8.1.�A separator between the fingers to prevent pinching the arrow may be used. An anchor plate or similar device attached to the finger protection (tab) for the purpose of anchoring is permitted. The stitching shall be uniform in size and colour. Marks or lines may be added directly to the tab or on a tape placed on the face of the tab. These marks shall be uniform in size, shape and colour. Additional memoranda is not permitted. On the bow hand an ordinary glove, mitten or similar item may be worn but shall not be attached to the grip of the bow.
To get a consistent tab position put the top of the tab just under the arrow nock, count down the required number of stitches with the thumb nail. Put the thumb nail on the string at that point. Then move the top of the tab down to the nail, keeping the nail on the string. Some archers keep the nail longer and flatter to make this easier.
If thick monofilament (say 0.5mm) is used for the centre serving then its possible to count down a number of threads on the centre serving, however most centre serving thread is too fine to do this.
Each 5 yard/meter change in distance will need about a 4mm tab stitch movement down the string which makes remembering all the sight marks a little easier.
One thing to avoid is the tab slipping up or down the string as you start to draw, keep some pressure with the thumb on the string until you need to move it out of the way to anchor.
Using a different anchor point for different distances, which does not have to be on the face. This is needed for longer distances as used in target archery.
The tip of the 1st, index, or forefinger to corner of the mouth and possibly the side of the finger located underneath the cheekbone is usually recommended as the starting position for the shorter distances. However the corner of the mouth is soft tissue and so can move a small amount. It's better to find a firm bone or tooth on the upper jaw as the contact for the finger. Any finger can be used but the 1st finger is better as it gives a bigger range of distances before having to change the anchor point. The corner of the mouth is probably too far to the side to get a good string picture so a point a little nearer the middle of the face needs to be used. The side of the hand or 1st finger should also be located underneath the cheekbone. If the thumb is on the cheek then some accuracy is lost. The thumb has to be kept out of the way, either with the thumb behind the jaw. Or better, with the thumb under the jaw, the V between thumb and finger on the rear corner of the jaw.
The hand under the chin a good position for longer distances. The problem with face walking is that the left right alignment could change with each position on the face (see String Picture). Adjust the aim by moving your hand up your face to go lower on the target, and down your face to go higher on the target. A combination of string walking and a limited number of face walking positions is often used.
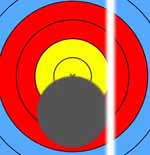 Usually the point of the arrow is used for aiming.
With face and string walking, the point of aim will often be the the centre of the target.
At longer distances or with small faces the arrow point may obscure the centre,
so it may be better to use the top edge of the arrow just below the centre of the target.
The draw length needs to be consistent for good groups as the angle of the
arrow to the eye line will change with different draw lengths.
To aim higher (for longer distances) after using the hand under the
chin anchor you can change to a different aiming reference on the bow.
Align the arrow rest or the shelf of the bow vertically with the centre of the target.
While using the arrow to keep the horizontal element of the aim on target.
Usually the point of the arrow is used for aiming.
With face and string walking, the point of aim will often be the the centre of the target.
At longer distances or with small faces the arrow point may obscure the centre,
so it may be better to use the top edge of the arrow just below the centre of the target.
The draw length needs to be consistent for good groups as the angle of the
arrow to the eye line will change with different draw lengths.
To aim higher (for longer distances) after using the hand under the
chin anchor you can change to a different aiming reference on the bow.
Align the arrow rest or the shelf of the bow vertically with the centre of the target.
While using the arrow to keep the horizontal element of the aim on target.
 Face walking, string walking and aiming with the arrow point or arrow
shelf all help with the vertical axis of hitting the target. You need
a consistent string picture to hit the middle on the left-right axis.
Usually the string should be lined up with something such as the edge
or centre of the riser, or with the side of the arrow. Also the head
should be as upright as possible while drawing and aiming the bow.
Leaning the head changes the distance between the arrow and the eye
and possibly the draw length and so changes the vertical position
where the arrow hits.
Face walking, string walking and aiming with the arrow point or arrow
shelf all help with the vertical axis of hitting the target. You need
a consistent string picture to hit the middle on the left-right axis.
Usually the string should be lined up with something such as the edge
or centre of the riser, or with the side of the arrow. Also the head
should be as upright as possible while drawing and aiming the bow.
Leaning the head changes the distance between the arrow and the eye
and possibly the draw length and so changes the vertical position
where the arrow hits.
For field archery, the wind may be different at every target. For a windage adjustment, the string can follow the arrows. If the arrows hit to the left of the target, align the string a little to the left (closer to the arrow for right handed), so the arrows will hit further to the right. This takes a lot of practice, but should be easier than adjusting the aiming gap at the target as its less dependant on the distance. For target rounds, if you have an easily adjustable button such as the Beiter then a few clicks will move the arrows in the same direction. e.g. For a right handed archer increasing the pressure by screwing the barrel in to the left, will move the arrows left.
With the hand under the chin you can easily get a good string picture, string to the tip of your nose, and arrow point centred on the target and to hit in the centre. With a side of the face anchor this is difficult, but without a good string picture the arrow may hit up 6 to 12 inches to the side for every 10 yards to the target making accuracy very difficult. To get a good string picture you probably need to turn your head more.
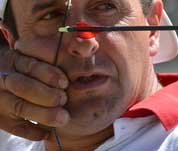
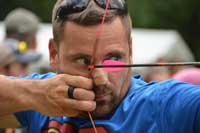 Some
archers lean their head a small amount towards the string. However,
if you lean too far, there is a good chance of the string hitting
your nose when the string moves towards your nose as it leaves your
fingers. Keep some plasters handy. Is that why this archer (John
Demmer) has them on his nose ? It seems several archers practice with
tape on their nose. The actual string picture you need depends on the
spine of the arrows. Weaker arrows will go to the right (for a right
handed archer) and stiffer arrows to the left, needing a slightly
different string picture to get into the centre of the target with
little or no gap shooting.
String walking will affect this, the more you move down the string the weaker the arrow acts.
The wind will also affect this.
Some
archers lean their head a small amount towards the string. However,
if you lean too far, there is a good chance of the string hitting
your nose when the string moves towards your nose as it leaves your
fingers. Keep some plasters handy. Is that why this archer (John
Demmer) has them on his nose ? It seems several archers practice with
tape on their nose. The actual string picture you need depends on the
spine of the arrows. Weaker arrows will go to the right (for a right
handed archer) and stiffer arrows to the left, needing a slightly
different string picture to get into the centre of the target with
little or no gap shooting.
String walking will affect this, the more you move down the string the weaker the arrow acts.
The wind will also affect this.
Some archers also cant or tilt the bow to stop the string or riser blocking their vision of the target, and line up by getting their eye directly above the arrow and then looking along the arrow. This may also reduce the chance of the string hitting your nose and keeps the arrow on the rest when the wind keeps blowing it off. However, there is not going to be a useful string picture. Lining up on the arrow may work well at short distances but will not be as accurate at longer distances when the nock is below your face.
This is the distance to the target for each face walking anchor position that the tab is at the arrow nock when string walking. Shorter distances then mean moving the tab down the string. Longer distances mean changing the anchor position or aiming reference. When getting sight marks for new arrows or a bow setup, start by finding the point on distance and then walk forward in 5 yards/meters steps to get the new string walk positions.
One method of estimating the gap for gap shooting is as follows, although I've no idea how to actually do this. First find the point on distance, then shoot point on at half that distance. The distance the arrow is above the target is the maximum gap needed to aim below the target, to hit the target at that distance. For other distances before or beyond the half distance reduce the gap proportionally. e.g. for 1/4 or 3/4 distance (half way to the half distance) use half the gap. This assumes the arrow travels in a straight line up to half way and then down to the target in another straight line. So it's probably not as accurate as string walking, but better than nothing if string walking and notes are not allowed.
For unmarked field rounds there is an additional problem of estimating the distance. However, if you can guess which of the 4 target sizes you are at, then there is a limited range of distances. So in a practice session you need to find 4 string walk positions that work best without having to estimate the distance. This is best done on a quite day at the range with a measuring tape laid from the target. Aiming at the centre, shoot arrows at all the allowed distances for a target size with one string walk position. Then try a slightly different string walk position and repeat. Find the string walk position for each target size that gives the highest minimum score throughout the distance range. White peg for Archery GB under 15, Yellow peg for World Archery cadet (Under 18), Blue peg for every one else in World Archery and Archery GB barebow.
| Target Size | White Peg Unmarked | Yellow Peg Unmarked | Blue Peg Unmarked | White Peg Marked | Yellow Peg Marked | Blue Peg Marked |
|---|---|---|---|---|---|---|
| 20cm | 5-10m | 5-10m | 5-10m | 5-10m | 5-15m | 5-15m |
| 40cm | 5-15m | 10-15m | 10-20m | 10-20m | 10-20m | 15-25m |
| 60cm | 10-20m | 15-25m | 15-30m | 15-25m | 20-30m | 30-40m |
| 80cm | 15-25m | 20-35m | 30-45m | 20-30m | 30-40m | 40-50m |
In competition, first estimate the target size, then use that string walk position to aim the first arrow at the centre. The second and subsequent arrows should use the same string walk but use a small amount of gap shooting to put them in the centre. If the first arrow was up in the 2 then aim at the bottom in the 2 for the second arrow.
As you get better at estimating the distance to the target, you can gradually switch to using your marked distance string walks.
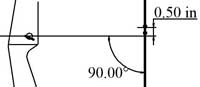
For both uphill and downhill shots, you need to use a closer sight mark. It turns out that the horizontal distance to the target is a good approximation of the sight mark needed. Even on marked rounds when the distance to the target is known the horizontal distance needs to be calculated. This is always going to be less than the actual distance by the cosine of the angle.
To make things easy it seems barebow archers learn points on their bow that are in 10% steps. Since marking the bow is not allowed, they use marks and reference points that already exist. E.g. the end of the riser, a limb bolt, a letter in the makers name, start of the end loop serving, etc. At the shooting position hold the bow out with the bow arm horizontal, if the target is at the 20% mark on the bow then reduce the target distance by 2 x 10%, which is easy to calculate before the shot.
So you need to find marks that roughly correspond to the following angles, for both uphill and downhill shots. Perhaps stand in front of a tree or wall, use an inclinometer (download an app to your smart phone) to find a point for 53o. Then find and remember that point on your bow as the 40% distance reduction. The following is a table of the angles for each 10% reduction of the aiming distance which can be used as a starting point.
| 10% | 26o |
| 20% | 37o |
| 30% | 46o |
| 40% | 53o |
| 50% | 60o |
Bow speed, distance and up or down will all affect the actual adjustment needed. It's necessary to get lots of practice and adjust the reference points to improve the accuracy. Remember when shooting uphill or downhill it is important to bend at the waist rather than raising or lowering the bow arm, so that the draw length is kept consistent.
Just found this: Tuning for Barebow by Rick Stonebraker
With barebow it's important to get the arrows flying straight, which means getting the arrow matched to the bow and setting the centre shot. Depending on the style, the bow may not be very adjustable, so it's probably easier to plan to adjust the arrows to match the bow. Since there is no clicker, arrow length is not as important provided they are long enough to be safe.
The arrow has to match the bow so that at first the pile or point moves away from the riser and the middle of the arrow curves into the bow. Then as the middle of the arrow passes the riser the arrow needs to bend away from the riser. Finally the as the fletchings pass the riser, the arrow has to have returned to the initial bend so the fletchings clear the riser. See Beiter high speed video. Arrow spine, length, pile weight, nock and fletchings all affect the frequency of the bending of the arrow. Bow weight will affect the speed of the arrow and if it can be changed, it may be adjusted to get the timing right. Adjusting a pressure button will have no effect on the arrow timing, but will affect centre shot.
For some barebow styles there is not much on the bow that can be changed, the nocking point height needs to be set and perhaps the centre shot may be padded out for thinner arrows. For recurve barebow the bow can be setup and tuned in the usual way. The Easton "Arrow Tuning and Maintenance Guide" is a good reference and it's free to download on the Easton web site. If you are string walking, then only one string walk position should be used at a point about half way between the longest and shortest distance to be shot. Change the anchor point on your face to look along the arrow if test shooting at a short distance, however, this may not be accurate enough to set the nocking point height.
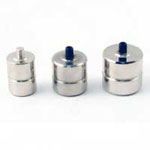 Add weight to the bottom of the riser to stabilize the bow.
Start by taping weights to the bottom of the bow, to find the amount of weight needed.
The bow should move forward after release without tilting back.
After you have found the weight needed you can obtain the same weight which will either
screw to the lower mounting bush with a 5/16th thread or fit inside the riser.
It's also worth trying the weight on the stabilizer bush as it may give less vibration.
After fitting the weight, the unbraced bow has to fit through a 12.2cm ring for Archery GB or World Archery field events, but not for Archery GB target events.
Spigarelli and GasPro do weights at about 190 grams (6.5oz (ounce)), 250 (9oz) and 350 grams(12.5oz), Arctec 300 (10.5oz), 400 (14oz), 500 (17.5oz) and 650 grams (23oz). The lightest should work on most bows, 250 to 350 grams will give more stability. Adding more weight than necessary will probably have little effect on accuracy.
Add weight to the bottom of the riser to stabilize the bow.
Start by taping weights to the bottom of the bow, to find the amount of weight needed.
The bow should move forward after release without tilting back.
After you have found the weight needed you can obtain the same weight which will either
screw to the lower mounting bush with a 5/16th thread or fit inside the riser.
It's also worth trying the weight on the stabilizer bush as it may give less vibration.
After fitting the weight, the unbraced bow has to fit through a 12.2cm ring for Archery GB or World Archery field events, but not for Archery GB target events.
Spigarelli and GasPro do weights at about 190 grams (6.5oz (ounce)), 250 (9oz) and 350 grams(12.5oz), Arctec 300 (10.5oz), 400 (14oz), 500 (17.5oz) and 650 grams (23oz). The lightest should work on most bows, 250 to 350 grams will give more stability. Adding more weight than necessary will probably have little effect on accuracy.
Use the arrow makers tables to find the correct spine. Light fletchings, heavy points and string walking will need a stiffer spine. Start with the best guess spine and arrows 2 inches too long, they should be too weak. First adjust the nocking point height. If the arrow flies with the nock low, move the nocking point up a 1/16" at a time. If the arrow flies with the nock high, move the nocking point down. Also check for contact with the arrow shelf or button which can flick the nock up and/or left (for a right handed archer). After that adjust the length to get the correct spine. Cut 1/4" off the length and try shooting again, until getting close, then cut 1/8" off the length until they go straight.
 Use a bow square to fit temporary nocking points, they will probably need to be moved during tuning.
Measure, make notes and fit permenant nocking points after tuning.
Start with the upper nocking point about 1/2" above square.
String walking needs a higher nocking point than if the index finger is touching the nock.
Use a bow square to fit temporary nocking points, they will probably need to be moved during tuning.
Measure, make notes and fit permenant nocking points after tuning.
Start with the upper nocking point about 1/2" above square.
String walking needs a higher nocking point than if the index finger is touching the nock.
Centre shot is not always adjustable. If there is padding on the arrow shelf then the thickness of the padding can be changed a small amount, possibly by using a thin piece of wood like a bit of matchstick behind the padding. If there is a button then the button position and spring strength can be adjusted. Start by setting the spring to a mid strength and the arrow position to be just outside of centre shot. When the arrow is released it will push the button in a little so that it becomes centre shot. After the arrows are matched to the bow, the button position and spring can be adjusted in small steps to get the arrows hitting the centre at all distances and the smallest group size.
Various documents on the internet say the button only moves about 0.5mm when the arrow is released. When the bow is at full draw the button is a couple of inches from the arrow pile, and should also be about 0.5mm outside of centre shot. Then when the arrow is released, the button will compress and bring the arrow into centre shot. It should then go straight to the centre of the target at any distance without having to adjust left or right.
With the undrawn bow the button is at brace height from the nock, and using the tip of the arrow to set the button position will magnify the position of the button by (arrow length)/(brace height) or a little over 3 times. So with the string aligned with the centre of the limbs, the tip of the arrow needs to be about 1.5mm outside of centre shot. Beiter limb gauges are an easy way to find the centre of the limbs. For a string of about 2mm diameter and standing roughly twice the arrow length from the string, the center of the arrow tip should be inline or just outside the outside edge of the string. A less experienced archer with a more variable loose, may use slightly more movement of the button and need the button to be set slightly further out.
Button pressure is best set at some mid position, a high bow draw weight will probably need a higher button pressure, and a low draw weight a lower button pressure. Easton recommends fine tuning of the button pressure for the smallest group size, which makes sense if the button is to compensate for slight variations in the release. After fine tuning the button pressure it may be necessary to make a small adjustment to the button position to get the arrows going to the centre of the target at all distances.
 If there is no rest or a stick on plastic rest, then there is nothing to adjust.
The wire arm of an adjustable rest should not be much further out than the side of the arrow.
For string walking there needs to be a strong rest to take the extra vertical forces.
Both the stick on Hoyt super rest and the thick wire Spigarelli Z/T rest seem to be popular with barebow archers.
If there is no rest or a stick on plastic rest, then there is nothing to adjust.
The wire arm of an adjustable rest should not be much further out than the side of the arrow.
For string walking there needs to be a strong rest to take the extra vertical forces.
Both the stick on Hoyt super rest and the thick wire Spigarelli Z/T rest seem to be popular with barebow archers.
 The Z/T type rest has several adjustments which are done in order. The silver grub screw and black screw on the other side are loosened to adjust the height and position of the wire. The pair on the end adjust the free play in the pivot, tighten one until the arm does not move, then loosen until the arm swings out freely, repeat with the other. The top screw held by a nut adjusts the magnetic force, but this also affects the arm position so the other adjustments need to be redone. It is also possible to bend or cut the wire if that helps.
Keep spares handy, string walking puts a lot of stress on the rest. The thin wire type of rest can fail slowly over a more than a hundred arrows. First your sight marks will become a little variable, then the arrows will start falling off the rest more often. Lastly you would notice the arm seems a little soft and a close inspection will reveal a small crack inside the 90o bend, this is just before the arm falls off.
If the maker gives a brace height for the bow then start at the lower end of the range and work up to the high end by adding twists to the string. Find the quietest brace height for the bow by shooting. If the maker does not give a range use the following table. For string walking a higher brace height usually works best.
| Bow Length | Brace Height |
|---|---|
| 64" | 8 1/4" to 8 1/2" |
| 66" | 8 3/8" to 8 5/8" |
| 68" | 8 1/2" to 8 3/4" |
| 70" | 8 5/8" to 8 7/8" |
The nock should hold the arrow on to the string with the string horizontal and the arrow hanging down. It should fall off the string when the string is tapped. If one nock is loose, replace it, don't try and adjust it by biting. If all the nocks are loose, replace the center serving with something slightly thicker, or use a string with more strands. If the nocks are tight, try a thinner serving or a string with fewer strands.
There are several methods to check the arrow flight, since the fletchings correct the flight, shooting unfletched arrows shows up more errors. Bare shaft planing is probably the best method. Paper tuning can record the flight in a clear way but only at one point. Walk back tuning can check that the arrows go to the centre of the target at all distances. Success depends on how good and consistent your loose is. If you are string walking then tuning is difficult since it will vary with the distance down the string. Pick a mid distance and tune the bow for that. It might help to have a different string with the nocking point height set for 18 metre / 20 yard indoor rounds, even if you are using the same arrows as outdoors.
With a couple of unfletched arrows start at 10 yards and move back to 20 yards as the tuning improves. Watch the arrow, for a right handed archer, if arrow is too weak the nock will be to the left and will impact to the right of the target. If it's too stiff the nock will be to the right and the arrow will impact to the left of the target. However, it's almost impossible to watch your own arrows in flight, and the arrows may be deflected from there path as they enter the target.
Bare shaft planing is an easier method than watching how the arrows fly. Shoot a few fletched and unfletched arrows from around 10 yards. Move back to 20 or 30 yards as the tuning improves. The nocking point should be only be adjusted at a mid string walk position. If the unfletched are above the fletched arrows move the nocking point up at little. If they are below, try moving the nocking point down. Once there are at the same height work on the left to right difference. Adjust the centre shot and/or button pressure so the fletched arrows land in the centre. If the unfletched arrows are to the right (for a right handed archer), then they are too weak. Try cutting down the arrows or use lighter points. Heavier fletchings or wraps might also help. If it's adjustable, reduce the bow weight. If that does not work get stiffer shafts. If the unfletched arrows are to the left, then they are too stiff. Try using a heavier point weight (10 to 30 grains) or increase the bow weight. Lighter fletchings may help. If that does not work get longer or weaker shafts.
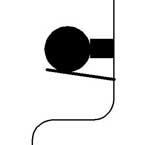
 Another alternative is paper tuning, which can be started in less space.
Shooting bare shafts or fletched arrows from 4 to 6 feet at a
sheet of paper about the same distance from a boss. Bare shafts will
look slightly weaker than fletched arrows due to the slightly lower
weight at the nock end, it is also much harder to read the direction
of the tear in the paper from the bare shaft. The tear in the paper
shows how the arrow is flying. The thick tear is the shaft and the
thin tears are from the fletchings. So the picture shows the nock
slightly low and left, so the nocking point is low and the arrow weak
(for a right handed archer). Adjust the arrow length, centre shot and
nocking point height as above until the arrow is making a small hole.
Unfortunatly, while a long tear means the tuning is wrong, a small hole
does not always mean it's right. You need to try from several different
distances, even as far as 20 yards, and get a small hole every time.
Another alternative is paper tuning, which can be started in less space.
Shooting bare shafts or fletched arrows from 4 to 6 feet at a
sheet of paper about the same distance from a boss. Bare shafts will
look slightly weaker than fletched arrows due to the slightly lower
weight at the nock end, it is also much harder to read the direction
of the tear in the paper from the bare shaft. The tear in the paper
shows how the arrow is flying. The thick tear is the shaft and the
thin tears are from the fletchings. So the picture shows the nock
slightly low and left, so the nocking point is low and the arrow weak
(for a right handed archer). Adjust the arrow length, centre shot and
nocking point height as above until the arrow is making a small hole.
Unfortunatly, while a long tear means the tuning is wrong, a small hole
does not always mean it's right. You need to try from several different
distances, even as far as 20 yards, and get a small hole every time.
Remember changing the string walk position will change everything. Moving down the string will make the nock fly lower and the arrow act a little weaker. So only tune for one position.